|
|  |
This page focuses on how to draw using the ogino store's action set, and shows you how to easily create a projection (axis projection) using Adobe Illustrator.
Descriptions such as how to draw are aimed at those who can do basic operation of the illustrator.
Actions are available in Illustrator version 8.0 and later.
The features of the action set introduced here are:
1. Complete the work from drawing to finishing on Illustrator!
2. Trimetrics and rotational drawings can all be made exactly in the same procedure.
3. The created 3D view matches the 3D CAD output (parallel projection).
It is a method of creating a plan in three dimensions by using scaling, shearing and rotation.The shrinkage ratio of isometrics is 81.65%.
|
Top view
Shrinking width 81.65% Shrinking height 70.71%
-> Shear horizontal 30 -> Rotation -30
Front view
Shrinking width 81.65% Shrinking height 70.71%
-> Shear horizontal -30 -> Rotation -30
Side view
Shrinking width 81.65% Shrinking height 70.71%
-> Shear horizontal 30 -> Rotation 30
|
Next, let's look at a concrete example of a drawing method that uses such deformation.
2.2.Drawing method using deformation
| 1. |
Create a flat figure.
The thickness of the line is 0.5 pt (thin line).
|

|
| 2. |
It is a modification of the front view.
|
Shrinking width 81.65%
Shrinking height 70.71%
Shear horizontal -30
Rotation -30
|
|
 |
| 3. |
Rotates the minor axis of the ellipse to be horizontal.
In this case, the rotation is -30.
|

|
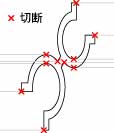
| 4. |
It cuts at the contact point of the horizontal line and the figure.
Using a smart guide will help you find the cut point.
|

|
| 5. |
Copy the blue part in the right figure (the part that will become thin line) and slide it horizontally to the right.
|

|
| 6. |
Connect the parts cut off at 4.
|

|
| 7. |
Cut off excess lines.
|

|
| 8. |
Make the line 1pt (thick line).
|

|
| 9. |
Paste the part copied at 5 to the front (or back).
|

|
| 10. |
Add a thin line.
|

|
| 11. |
It is completed if you return the angle at 30 rotation.
|

|
|